“How to Master the 7 Steps of Apple Jelly Recipe”
There’s something magical about the first bite of homemade apple jelly. It’s like a burst of joy that lights up your day. I still remember the first time I made jelly. The kitchen filled with the scent of apples, reminding me of autumn and family.
Those moments made me want to perfect my apple jelly recipe. In this guide, we’ll cover seven key steps to make your own perfect homemade apple jelly. We’ll talk about ingredients, techniques, and tips to enjoy your hard work.
Table of Contents
Key Takeaways
- Making apple jelly is an enjoyable and rewarding process.
- Fresh, quality ingredients are crucial for the best flavor.
- Mastering the process involves understanding temperatures and timing.
- Proper canning techniques ensure long-term storage of your jelly.
- Perfect homemade apple jelly can elevate many dishes with its sweet touch.
- Attention to detail helps achieve the right consistency every time.
Introduction to Making Apple Jelly
Creating apple jelly has always been a passion of mine. It’s a way to preserve seasonal apples and enjoy a rewarding culinary process. If you’re new to making apple jelly, don’t worry. It’s easy and fun.
When I started making jelly, I realized it captures the essence of fresh fruit. It turns fresh fruit into a delicious spread that makes any meal better.
Making apple jelly at home lets you work with top-quality ingredients. It’s a chance to enjoy the simple act of making something from scratch. From picking apples to canning, each step shows the beauty of homemade goods. This guide will help you master it.
Understanding the Basics of Jelly
To start making easy apple jelly, it’s important to know what jelly is. Jelly is made of three key things: fruit juice, sugar, and pectin. These mix together to make the tasty spread we love. They cook until the jelly is just right, firm but soft.
Knowing the difference between jelly, jam, and preserves helps me make better jelly. Jelly is made just from juice, making it clear and smooth. This is key to following any apple jelly recipe guide and getting great results.
Essential Ingredients for Apple Jelly Recipe
To make great apple jelly, picking the right ingredients is key. Quality apples, the correct sugar, and pectin are all important. This part talks about each ingredient’s role and gives tips to improve your jelly.
The Importance of High-Quality Apples
Quality apples are the base of my jelly recipe. I choose tart apples like Granny Smith or Honeycrisp. These apples add a great taste and lots of natural pectin.
The natural pectin helps the jelly set right. This is crucial for getting the perfect jelly texture.
Choosing the Right Type of Sugar
Granulated sugar is the best for apple jelly. It adds sweetness without changing the flavor. I avoid artificial sweeteners because they can ruin the taste and texture.
Using granulated sugar helps me make better apple jelly. It ensures the jelly tastes great without any bad flavors.
Pectin and Its Role in Jelly Making
Pectin is key in jelly making. I use products like Ball Classic Flex Batch Pectin for reliable results. It’s important for the jelly to thicken right.
Knowing how pectin works with apples and sugar helps me make great jelly. It makes the process fun and rewarding.
Gathering Your Jelly-Making Supplies
To make homemade apple jelly, you need to gather all your supplies first. The right tools make the process smoother and improve your jelly’s quality. I’ll guide you on what cooking equipment you need and how to prepare your canning jars.
Recommended Cooking Equipment
Quality equipment makes making apple jelly easier and more fun. Here’s a list of must-haves:
- A heavy, stainless-steel pot
- A jelly strainer or cheesecloth
- A stirring spoon made of wood or silicone
- A ladle for filling jars
- A jar funnel to reduce spills
- A set of basic kitchen utensils
Preparing Your Canning Jars
Preparing your canning jars is key to safe and long-lasting apple jelly. Start by sterilizing the jars in boiling water for at least ten minutes. This kills bacteria and gets the jars ready for sealing.
Let the jars dry completely before filling. This step keeps your jelly-making process efficient. Clean equipment is essential for a successful canning journey.

Step-by-Step Guide to the Apple Jelly Recipe
In this section, I will guide you through making apple jelly. We start with preparing the apples for juice extraction. Follow these beginner tips to master apple jelly preparation.
Preparing the Apples for Juice Extraction
First, I choose fresh, high-quality apples. I wash them well to remove any pesticides or dirt. Then, I chop the apples into quarters, keeping the skins and seeds on.
This helps with flavor and juice extraction. I put the chopped apples in a pot, cover them with water, and simmer for about 30 minutes. This softens the apples.
Extracting Fruit Juice Properly
Extracting juice properly is key. I use a jelly strainer or cheesecloth for this step. After simmering, I pour the apple mixture into the strainer.
I let the juice drip into a bowl without squeezing. This method gives me clear juice, which is important for a beautiful jelly. It takes patience but ensures a quality jelly.
After collecting the juice, I’m ready for the next steps in jelly-making. These tips will help you make a fantastic apple jelly with great flavor and consistency.
Cooking the Jelly Mixture
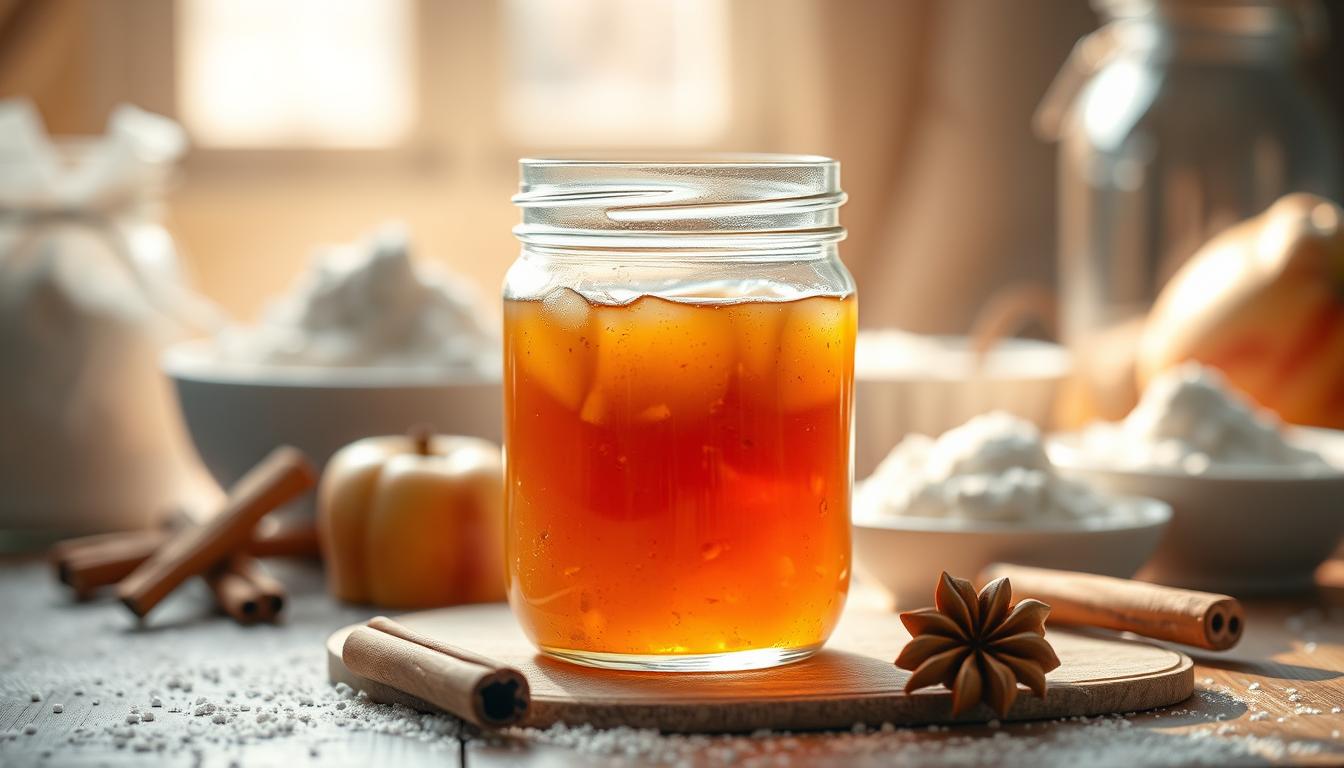
Cooking apple jelly needs careful attention to temperature and timing. It’s important to watch the jelly mixture as it heats. Jelly is usually ready when it hits around 220°F. This step is key in my apple jelly recipe guide to get the perfect texture without overcooking.
Understanding Temperature and Timing
Using a reliable candy thermometer is crucial during cooking. Heat the jelly until it reaches the desired temperature, which takes about 10 to 15 minutes. Stir occasionally to avoid scorching and watch the bubbles. When the mixture thickens, it’s time to test if it’s done.
Testing for Doneness in Your Jelly
There are several ways to check if your apple jelly is ready. Here are my top methods:
- Sheet test: Cool a spoon in the mixture, then tilt it. If the jelly forms a sheet, it’s almost ready.
- Cold plate test: Put jelly on a cold plate and freeze for a minute. If it gels right, it’s done.
- Temperature check: Use a candy thermometer to see if it’s at 220°F.
Using these methods will help you make delicious apple jelly. Remember, being patient during this step is worth it!

Filling the Jars: A Crucial Step
Filling canning jars right is key to keeping your apple jelly fresh. I make sure the jelly stays sealed in the jar. I use a ladle to pour the jelly into each jar, trying not to spill any.
This careful pouring saves time and keeps the process neat.
The Right Techniques for Jarring Jelly
I always keep my workspace clean and use sterilized jars. When filling, I leave about ¼ inch of space at the top of each jar. This space is important because it lets the jelly expand during processing.
After filling, I check each jar for air bubbles. Getting rid of these bubbles helps the jar seal better and keeps the jelly fresh longer.
Headspace Considerations for Canning
Headspace is not just a rule; it’s crucial for canning success. The ¼ inch space lets the jelly expand during heating, keeping the seal tight. Before sealing, I wipe the rim of each jar clean.
This ensures the seal is not broken by jelly or residue. By focusing on these steps, my apple jelly stays delicious and ready to enjoy.
Processing the Jars for Long-Term Storage
After filling my jars with apple jelly, I move on to the next step. This is to process them for long-term storage. Water-bath canning is key here. It kills bacteria and seals the jars, keeping the jelly fresh.
Water-Bath Canning Techniques
I start by putting the filled jars in a boiling water canner. It’s important to make sure the jars are covered by at least an inch of water. This even heating creates a vacuum seal.
Processing apple jelly takes about five to ten minutes. This time can vary based on altitude and jar type. It’s wise to check a reliable source for exact times.
Safety Tips for Canning
Safety is crucial when canning, like with an apple jelly recipe. I wear gloves to protect my hands from heat. It’s also important to check jars for any damage before use.
I make sure my workspace is clean to avoid contamination. After processing, I let the jars cool completely on a clean towel. This prevents any hazards.
Expert Tips for Perfect Homemade Apple Jelly
Making perfect homemade apple jelly needs careful attention and some expert advice. Common mistakes can ruin your jelly. Knowing what to avoid is key to getting it just right.
Avoiding Common Mistakes
When making apple jelly, some mistakes can mess up the result:
- Incorrect Measurements: It’s vital to measure ingredients accurately. A tiny mistake in sugar or pectin can change the jelly’s consistency.
- Ingredient Substitutions: While trying new things is fun, swapping out sugar or pectin can cause surprises.
- Overcooking: Cooking the mix too long is a common mistake. It can make the jelly too thick instead of perfect.
How to Achieve the Right Consistency
To get the right gel consistency, follow these tips:
- Use a reliable testing method like the plate test to check if it’s done.
- Keep an eye on the cooking temperature—medium heat is best for controlled cooking.
- Stir the mix gently to keep the pectin from breaking down. Pectin is key for the right gel.
Storage and Usage of Your Homemade Apple Jelly
Making delicious apple jelly is a big effort. Knowing how to store it right is key to keeping its taste and quality. I keep my jars in a cool, dark spot. This helps keep the flavors good for longer.
Labeling the jars with the date I made them helps me remember when to use them. These steps make storing apple jelly easy and effective.
How to Store Your Jelly Effectively
Storing your apple jelly right can make it last longer. Here are some tips:
- Make sure jars are sealed well to keep air out.
- Store in a place with a steady temperature; avoid very hot or cold spots.
- Keep jars standing up to prevent leaks and keep them strong.
Creative Uses for Apple Jelly in Recipes
Apple jelly is more than just for toast. It can add sweetness and flavor to many dishes. Here are some ideas:
- Use apple jelly as a sweet glaze for meats like pork or chicken.
- Mix it into salad dressings for a fruity twist.
- Add it to savory sauces for an unexpected layer of flavor.
Exploring these uses turns each jar into a special ingredient. It makes my favorite recipes even better.
Conclusion
This apple jelly recipe guide has given you the basics to make perfect homemade apple jelly. You learned how to pick the best apples and can them. I shared tips to make a tasty and beautiful jelly.
Now, you can try different flavors and variations. Making your own jelly lets you add a personal touch. It’s great on toast, in cooking, or as a gift.
It’s time to start making your own apple jelly. I hope you’re excited to enjoy your hard work. Remember, success comes from patience and creativity in making the perfect homemade apple jelly.